What type of lighting is best for a bathroom? — 7 smart picks you can use today ✨
Quick note: This article is written for you — practical, step-by-step, no fluff. You’ll learn which lighting types to use where, how to pick color and brightness, two quick formulas for planning, real-life scenarios, common mistakes, and trusted resources to follow up. Read the summary if you’re in a hurry; dive into the details afterward.
Why this matters to you (short answer)
If your bathroom lighting is off, everyday tasks like shaving, applying makeup, and showering take longer or look worse. The right lighting makes the space safer, saves energy, and helps you look good in the mirror — not washed-out or shadowed. Most people get the best balance by layering three types of light: ambient, task, and accent — with LED fixtures and careful color-temp choices. (More details and how-to below.)
Top authoritative quick reads (if you want to check now)
- Wikipedia — Bathroom (lighting basics and safety). A general overview including mirror lighting and IP ratings for wet areas.
- U.S. Department of Energy — LED lighting facts. Energy and longevity benefits of LEDs; great for comparing bulbs.
- ENERGY STAR — fixture and bulb guidance. How to locate energy-efficient, certified LED fixtures and why they matter.
- U.S. Department of Energy — lighting design. Practical design guidelines to think in layers and lumens.
- Consumer Reports — improve your home's lighting, room by room. Straightforward consumer advice about where to add fixtures and avoid glare.
- NFPA/NEC — electrical safety and code context. Check local electrical code references and safety requirements (GFCI, fixture ratings).
Three quick takeaways (if you skim)
- Layer light: Ambient + task + accent — that combination covers visibility, grooming, and mood.
- Use LEDs: They save energy, last much longer, and give consistent color; choose the right lumens and color temperature.
- Mirror lighting matters most: Place lights on either side of the mirror (or a wide strip above) to avoid face shadows.
How bathroom lighting is typically organized (the simple framework)
Think of bathroom lighting as three layers that work together:
- Ambient — general ceiling light(s) that make the room evenly visible.
- Task — focused lights for the vanity, mirror, and shower where you do specific tasks.
- Accent — optional mood lights or night lights for atmosphere and safe navigation at night.
Image: 3 easy methods (ambient, task, accent)
Alt: Bathroom with ceiling light, mirror sconces, and accent strip
Best lighting types for each bathroom zone (and why)
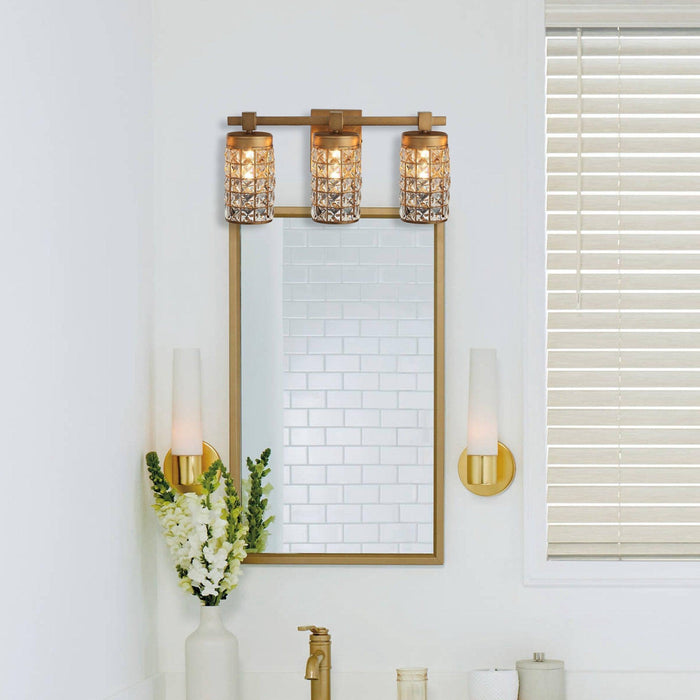
Vanity and mirror (where most people “need to see themselves”)
Best type: Vertical, even task lighting — two sconces mounted at about eye level on each side of the mirror, or a wide LED light bar above the mirror with a diffuser. Why? They minimize facial shadows and show accurate skin tone.
Color & brightness: Aim for 2700K–3500K for flattering skin tones (warmer) or 3500K–4000K if you prefer a more neutral/bright look. Target ~700–1600 lumens total at the mirror area depending on mirror size and vanity tasks.
Shower and tub (wet zones)
Best type: Recessed, rated waterproof fixtures (look for IP65 or the local equivalent for wet zones) or enclosed LED downlights designed for showers. Never use an open fixture not rated for damp/wet locations.
Safety note: Shower lights and nearby switches must follow local code — often GFCI protection and fixture zone ratings are required. See NFPA/NEC for safety context.
General ambient lighting
Ceiling-mounted flush or semi-flush fixtures, or an array of recessed downlights, give even coverage. Use dimmable LEDs so you can set a bright morning mode and a soft evening mode.
Accent and night lighting
Low-level LED strips under cabinets, toe-kick lights, or motion-activated nightlights keep trips to the bathroom safe at night without harsh glare.
Three tables to help you compare options
| Fixture | Best use | Typical lumens needed | Pros / Cons |
|---|---|---|---|
| Sconces (vertical) | Vanity sides | 700–1,000 lm | Even face lighting; fewer shadows / Need wall space; install height matters |
| LED light bar | Above mirror | 900–1,600 lm | Good for wide mirrors; choose diffuser to cut glare |
| Recessed wet-rated downlight | Shower, general ceiling | 600–1,200 lm each | Neat, sealed for wet areas / needs correct IP rating |
Assumption for Table 2: Typical family bathroom uses lights 1 hour per day total.
| Light type | Wattage (LED eq.) | Daily use (hours) | Weekly energy (Wh) |
|---|---|---|---|
| Old incandescent 60W | 60 W | 1 | 420 Wh (60 × 7) |
| LED equivalent (10W) | 10 W | 1 | 70 Wh (10 × 7) |
| LED integrated fixture (2 × 10W) | 20 W | 1 | 140 Wh (20 × 7) |
| Method | Ease | Time (DIY) | Best for |
|---|---|---|---|
| Swap bulbs to ENERGY STAR LEDs | Easy | 10–20 min | Budget upgrades |
| Install LED light bar above mirror | Moderate | 1–2 hours | Better vanity lighting |
| Add recessed wet-rated downlight | Hard | 2–4 hours (pro recommended) | Shower or ceiling overhaul |
Two simple formulas you can use right now (and examples)
Formula 1 — Rough lumens needed for a bathroom
Formula: Required lumens ≈ Target foot-candles × Area (sq ft)
Explanation: Foot-candles represent how bright a surface should be for tasks. A typical target for bathrooms is about 50 foot-candles at the vanity for grooming tasks.
Worked example: If your vanity area is 20 sq ft and you want ~50 fc:
- Compute:
50 fc × 20 sq ft = 1,000 lumens. - So you need about 1,000 lumens focused on the vanity area. If using multiple fixtures (say two sconces), split the lumens: ~500 lm per sconce.
Formula 2 — Energy savings estimate switching from incandescent to LED
Formula: % savings = (1 - LED wattage / Incandescent wattage) × 100%
Worked example: Replace a 60 W incandescent with a 10 W LED equivalent.
- Step 1: Calculate ratio:
10 / 60 = 0.166666... - Step 2: Calculate savings:
1 - 0.166666... = 0.833333... - Step 3: Convert to percent:
0.833333... × 100% = 83.33% - Result: You save about 83% energy per hour of use for that bulb. ENERGY STAR and DOE agree LEDs commonly save ~75–85% vs incandescent.
Practical step-by-step: Upgrade your bathroom lighting in a weekend (three-hour plan)
- Hour 1: Plan & buy — Measure mirror width and ceiling height. Decide color temperature (2700–3500K for warmer look; 3500–4000K for neutral). Buy ENERGY STAR LED bulbs/fixture(s). Use the ENERGY STAR product finder or local hardware.
- Hour 2: Swap and test — Replace bulbs and test different dim levels (use a dimmer compatible with LEDs if possible). Add side-sconces or an LED bar if you need better mirror lighting.
- Hour 3: Add finishing touches — Place a motion nightlight, add an accent strip under the vanity, and test safety (no flicker, no buzzing). If you touch wiring beyond bulb swaps, cut power at the breaker and follow local code or hire an electrician.
Three everyday scenarios and how to adapt lighting
Scenario A — Small apartment bathroom with no windows
Problem: The space feels cramped and colors look dull.
Fix: Use a high-CRI (≥90) LED light bar above the mirror (about 3,000–3,500K) plus one warm-dim ceiling fixture. High color-rendering index keeps skin tones accurate even without daylight.
Scenario B — Shared family bathroom used morning/evening
Problem: Kids turn on harsh bright lights at 6 AM; parents want something softer at night.
Fix: Install dimmable LEDs and a programmable switch or smart bulbs. Set a bright “wake” scene and a warm, lower night scene. Add a motion-activated low-level nightlight near the floor for safe navigation.
Scenario C — Luxury remodel with big mirror and vanity
Problem: Large mirror creates shadows from a single top light.
Fix: Use vertical sconces spaced evenly on both sides of the mirror and a central overhead ambient light. Consider layered dimming so you can have bright task light for grooming and softer light for relaxing.
Common mistakes people make (and how to avoid them)
- Placing a single overhead light above the mirror: This makes chin and eye shadows. Avoid by adding side lighting.
- Choosing the wrong color temperature: Too cool (high K) can make skin look washed-out. Test bulbs or buy returnable bulbs—2700K–3500K is safe for many people.
- Ignoring fixture wet/damp ratings: Installing an indoor-only fixture in a shower causes safety risks. Check IP ratings and local code. NFPA/NEC guidance is the baseline for safe electrical work.
Three short cautionary stories (realistic — learn from them)
Story 1: A renter swapped to a bright 5000K LED because they liked “daylight.” Their mirror reflected a blue tint, and makeup looked off — they swapped back to 3000K and felt immediate improvement.
Story 2: Someone installed recessed downlights in the shower but used a fixture not rated for damp locations; after a heavy shower they saw condensation and called an electrician. Lesson: verify IP/wet rating first.
Story 3: A DIYer bought cheap LEDs that flickered on a dimmer; the solution was to buy dimmer-compatible LED bulbs and a dimmer rated for LED loads — problem solved in under an hour.
How to shop: what to look for in bulbs & fixtures
- Energy rating / certification: ENERGY STAR certified fixtures and bulbs for performance and longevity. See ENERGY STAR listings and guidance.
- Color rendering index (CRI): Aim for CRI ≥ 90 for accurate skin tones.
- Color temperature (K): 2700K–3500K (warm-to-neutral) for vanity; 3500K–4000K for a crisper look.
- Lumens, not watts: Lumens measure brightness; watts measure energy. Use the formulas above to estimate lumens you need.
- Dimmability: Buy dimmable LEDs and compatible dimmers if you want adjustable scenes.
- Wet/damp ratings & installation instructions: For shower, tub, or areas above sinks where water may splash.
What the data and experts say (short verified facts)
LEDs use substantially less energy and last much longer than incandescent bulbs — commonly around 75–85% energy savings and 15–25× longer life in residential settings according to U.S. Department of Energy and ENERGY STAR guides.
Consumer-focused guides emphasize layered lighting and high-CRI bulbs for bathrooms as the most practical way to improve function and appearance.
Extra tips that make a big difference
- Spacing for sconces: Mount sconces at about 60–66 inches from the floor (eye-level) and about 24–36 inches apart for a typical mirror — adjust for user height and mirror width.
- Avoid direct glare: Use frosted diffusers or indirect lighting to reduce harsh glare on shiny surfaces.
- Test before permanent install: Try bulbs or temporary clamp-lights to test color and shadow before hard-wiring fixtures.
Quick checklist before you start
- Measure mirror width and ceiling height.
- Decide on overall brightness (lumens) and color temperature (K).
- Buy ENERGY STAR LEDs and check the CRI value.
- Verify fixture IP/wet rating for shower zones; check local code for GFCI requirements.
-
Final short recipe — What should you do right now?
If you want the fastest, most noticeable improvement today: swap old bulbs for high-CRI (≥90), ENERGY STAR LED bulbs at ~3000K, and add a pair of side-sconces or a single diffused LED bar at the mirror. That combination fixes shadows, improves color, and saves energy.
Summary — in your words
What type of lighting is best for a bathroom? A layered approach that uses ENERGY STAR LEDs: ambient ceiling lighting for even visibility, vertical task lighting at the mirror to eliminate shadows, and small accent/night lights for safety and mood. Choose high-CRI LEDs at a comfortable color temperature (2700–3500K for warm/skin-flattering light, or up to 4000K if you prefer neutral). Verify wet/damp ratings and electrical safety before installing fixtures. The result: better grooming, safer showers, lower bills, and a bathroom that finally looks — and feels — right.
One last image: comparison tips
Alt: Side-by-side comparison of vanity lighting options
Data image: energy vs time
Alt: Bar chart comparing weekly energy use: incandescent vs LED
Key takeaway: Layered, LED-based lighting with proper color temperature and high CRI wins for bathrooms — it improves visibility, safety, and energy bills. Start small (swap bulbs), then add task lighting (sconces or a bar) for a big improvement.